Tutorial for creating a Timeline web-site
Here are step by step instructions for registering your own web-site on the PLU server, and creating a web-page that contains a timeline of your own. Once you have successfuly created this web page and posted to it the 10 events you and your group have chosen, you will have fulfilled this requirement of the course and need have nothing further to do with the internet if you so choose.
On the other hand, my hope is that you will take this opportunity to seize these internet tools and make them work for you. You may use your new web page and the timeline as a way to organize your understanding of the material we cover this semester; a way to learn and get comfortable with some of the now ubiquitous technologies which drive computer applications in the humanities and in so many other disciplines; or as a way to communicate what you have learned to me, and to your colleagues both in class and around the world. You may find that this is a way to make a contribution to a community of scholars that reaches far beyond PLU.
- Step 1: Register a web-site on the PLU server
- Each registered student at PLU is alloted space on a server to maintain a web-site if they choose. To create such a site you must first register it:
- Go to http://www.plu.edu/current-students/.
- Click on the "eResources" tab.
- Click on the "E-mail & Web" sub-tab.
- Under "Web Pages," click on the link "Register A Web site".
- You may be asked to log in with your regular ePass login name and password.
- Follow the directions in the page that then opens for you. Once you have registered your web-site, it can take as much as an hour for the account to be created on the server, so go have lunch.
- Step 2: Download template files from the course Sakai - Resources page
- The template files for the timeline must be downloaded from the course Sakai site to the machine you are using, and then uploaded to your newly created web-site account.
- First, check to see if your web account has been created by going to http://www.plu.edu/~yourusername. If your account has been created you will see your "home page". There won't be anything much there
- Go to the class Sakai site at https://sakai.plu.edu/portal/site/HIST215_01_20542_FALL2007.
- In the "Resources" section you will find two files: timeline215.html, and timeline215.xml.
- Right-click on these files and choose "save file as" or "save link as" depending on your browser.
- Save these files to the desktop of the machine you are using, or somewhere you can easily find them again, like MyDocuments.
- Step 3: Upload the template files to your new web directory.
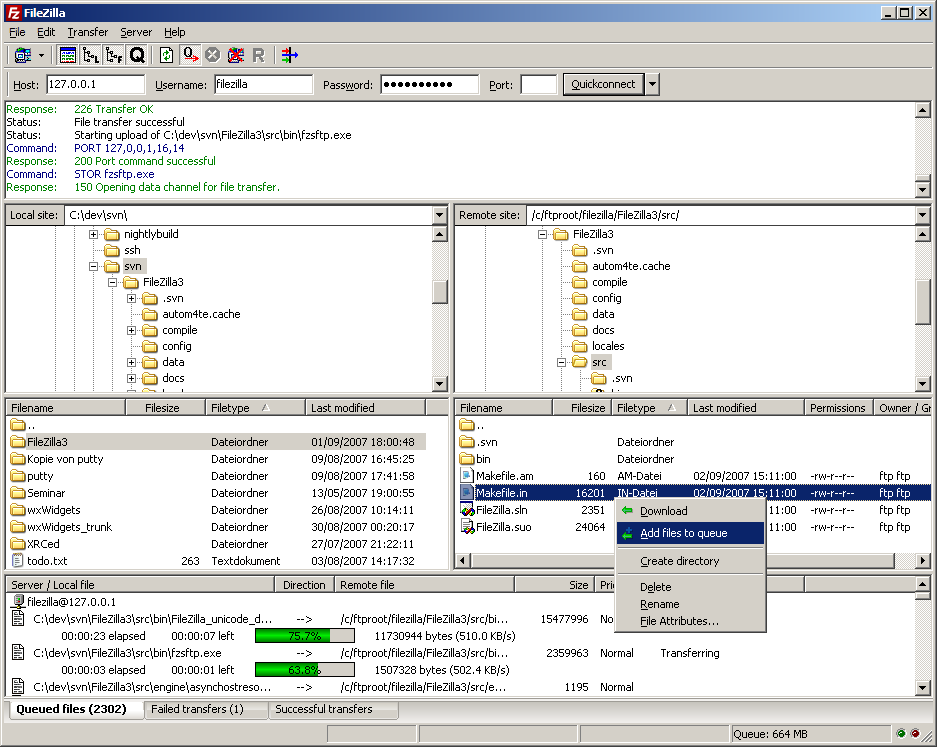
- For this step you will need an FTP client program. FTP stands for "file transfer protocol" and that's all this program does: transfer files from one place to another. There are many such programs available, and they all work similarly. If you are using one of the computers in the Library, the FTP client you will find on your machine will probably be FileZilla. The instructions below are written with FileZilla in mind, but the proceedure for any other FTP client will be very similar. (If you are using a Mac, you'll want to use Fetch or Fugu).
- From the "Start" menu, look under programs for FileZilla and click on it.
- A window should open that looks like the window pictured at the bottom of this page.
- You can ignore the window panes at the top and bottom.
- At the top of the window you will see spaces marked Host, Username, Password and Port.
- In the Host: space put sage.plu.edu
- In Username: and Password: put your regular ePass username and password.
- In Port: put nothing.
- Then press "return".
- Now the right pane of the FileZilla window should be showing you the contents of your new web directory, and the left pane should be showing you the contents of the machine you're using.
- In the right pane, find a folder marked public_html and double-click it to open. You should see nothing but a file marked home.html, that's your home page and you can edit it to suit, but for now just ignore it.
- In the left pane, navigate upward until you find the Desktop. There you should find the files you downloaded named timeline215.html and timeline215.xml.
- Now you can click on these files, drag them to the right-hand pane, and drop them there. Or you can right-click on them and choose "upload".
- Now open a web browser (Firefox) and go to this address: http://www.plu.edu/~yourusername/timeline215.html and you will see your timeline.
- Step 4: Edit the timeline215.xml file to show the 10 events you have chosen.
- For this step you will need a text editor. The one you will find on the machine you're using will probably be Microsoft's "WordPad." Do not use Microsoft "Word" to edit this file!
- From the Start menu, navigate to programs and click on WordPad.
- Look under the File menu and choose Open.
- Navigate to the Desktop and open the file timeline215.xml. You will see something that looks like this:
		<?xml version="1.0" encoding="utf-8"?>
		<data  date-time-format="iso8601">
			<event start="1162" end="1267" icon="orange-square.png" title="Genghis Kahn"> Genghis Kahn c1162-1227</event>
			<event start="1241-04-09" icon="orange-square.png" title="Battle of Liegnitz 1241"> Battle of Liegnitz 1241</event>
			<event start="1254-09-15" end="1324-01-09" isDuration="true" color="#808040" title="Marco Polo">Life of Marco Polo (September 15, 1254 – January 9, 1324</event>
			<event start="1279" title="Mongol conquest of China complete"  icon="orange-square.png">Mongol conquest of China complete.</event>
			<event start="1260" end="1313" isDuration="true" color="#808040" icon="orange-square.png" title="Rabban Bar Sawma">"The History of the Life and travels of Rabban Bar Sauma" is included as a pdf document with Fernandez-Armesto's textbook. Here is the brief introduction from that document: "Bar Rabban Sawma (1260-1313 CE) was a Christian monk from northern China. He was a member of a group of Turks who, like a number of steppe peoples, had been converted to Nestorian Christianity by missionaries from the Middle East. Rabban Sawma traveled with a companion, Markus, on pilgrimage to Jerusalem but was sidetracked on a diplomatic mission for the Mongol khan. He went to Byzantium and Western Europe seeking allies for a combined attack intended to push the Mamluk Egyptians out of Jerusalem. Rabban Sawma died after returning to Baghdad, having never reached Jerusalem".</event>
			<event start="1295" end="1304" isDuration="true" color="#808040" title="the rule of the Il-khan Ghazan">The mongol successor state of the Il-kahns (subordinate rulers) of Persia led by Ghazan Kahn, converted to Islam in 1295. The Il-Kahns chose the Shiite sect as opposed to the dominant Sunni making Persia, and therefor the modern country of Iran, exceptional in the Muslim world.</event>
		</data>
- Using the existing event elements as a model, create a new event element for each of the 10 events you have decided upon, then save the file. Note that start and end dates must be either years like this: yyyy, or dates formatted like this: yyyy-mm-dd.
- Now, using the procedure described in Step 3, transfer the file timeline215.xml again to your public_html folder using FileZilla. FileZilla will ask you if you want to overwrite the existing timeline215.xml file. You should click yes, or OK.
- In Firefox, navigate back to http://www.plu.edu/~yourusername/timeline215.html and you should see the timeline with your events added.
- Step 5: Transfer the Icons you want to use in the timeline to your public_html folder.
- After you have set up your timeline as described above, you will notice that the orange-square icon marking your events does not show up. You need to transfer the image for that icon to your public_html folder. For the official events of the class timeline we will use the orange-square.png icon, but for additional events you may add to your own timeline you can use any other icon you want. A list of icons you might use appears at the bottom of the class timeline at http://www.plu.edu/~crumpjj/hist215/timeline/hist215timeline.html. To transfer any of these icons to your public_html folder
- Right-click on any of the icons in the list at http://www.plu.edu/~crumpjj/hist215/timeline/hist215timeline.html and choose "save file as" or "save image as" to save the image to the desktop of the machine you are using.
- Now use FileZilla as described in Step 3 to transfer the image file to your public_html folder. Now the icons you have chosen and specified in each of the <event> elements will show up on the time line.
- For <event> elements that are durations, spans of time rather than single dates, please use the color attribute as in the model above: color="#808040". For any other <event isDuration="true"> elements that you might care to add to your own timeline, you can use any color you choose.
- Now You're Done!!!
Screen-shot of the FileZilla file-transfer window: